

Are you looking for an easy way to add affiliate products from Shareasale, Linkshare, Amazon, Affiliate Window or Commission Junction in WordPress? Datafeedr offers an easy way for you to add affiliate store to your wordpress blog without the need of programming. It is a WordPress plugin to import affiliate products to your online store easily.
What is Datafeedr?
Datafeedr.com is an affiliate marketing solution maker that can integrate thousands of products from different merchants and from wide variety of options into your wordpress site in an instant. The process of data feeding is made a lot easier, faster and accessible for everyone. The main objective of this system is to provide quality data feeding process for affiliate marketing sites without having to worry about codes and with just a click of a button the products will be displayed on your site. With Datafeedr, you can earn a lot of money from helping merchants market their products into your site, not just to one site but to every site you wish to create. Datafeedr can instantly feed any products into your site and you are in control for any niches you can think of. The system provides you with everything you need to run your ecommerce site smoothly.

Features of Datafeedr
Datafeedr is SEO optimized and it allows you to add products from different merchants easily You are in control of everything, from the smallest up to biggest details of your site. There are many merchants to choose from and thousands of product as well. You can display prices, thumbnails, descriptions and even create comparison charts. You can customize your category pages and tweak it to display the amount of products to display on each page. You can also tweak the size of thumbnails using custom CSS feature. Instead of manually updating, you can enable drip feature to auto post new products to your website. It is simply the best plugin for creating affiliate store in WordPress.
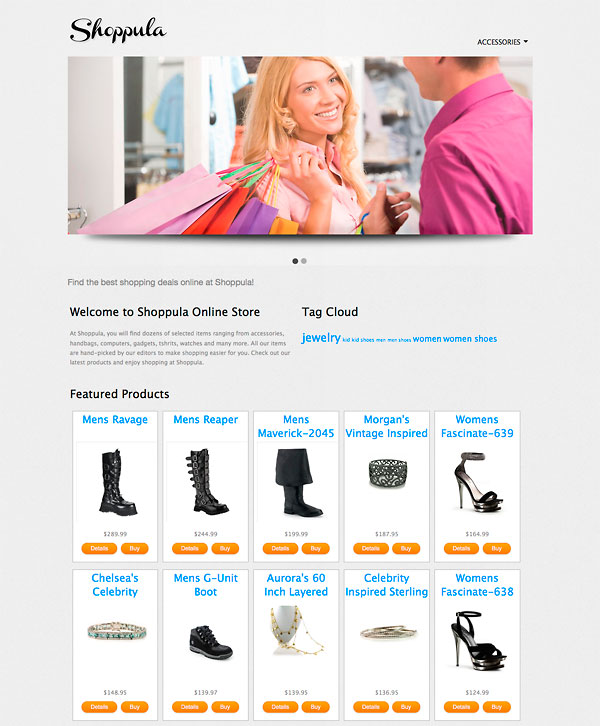
Case Study: Shoppula.com
In this case study, I will show you how I created an online shopping store. My online store sells accessories, mens and women clothings, shoes etc. I will not go into details of the whole setup as it is going to be long and broing. Once you have signed up with Datafeedr, you can login to Datafeedr and add products and customize your shop. The next step is to install a wordpress theme and install Datafeedr plugin.
Configuring Datafeedr
Basically, to start a store you need to sign up with an affiliate merchant. I signed up with Shareasale as it offers lots of merchants for different categories.
On approval, I simply enter my Shareasale affiliate id so that all my products have my Shareasale tracking id to get commissions. There are literally hundreds of merchant stores to select and each merchant store contains thousands of products to choose from. So there is no lack or products to add. I selected merchants that sell shoes as the first category as I want to begin working on shoes category.

I created a new category named Accesories and added Shoes as sub category. I then added another 2 sub categories: Men and Women. To add new products, you simply have to search for keywords and add the products. That’s it, very simple.

Configuring WordPress
The wordpress part is easy. If you haven’t setup a wordpress site before you can check my tutorial on how to setup a wordpress site. So after setting up wordpress, I need a professional looking theme for my store. I found this nice looking Wp Flexishop theme from Themeforest that fits my needs.
Next, I uploaded the Datafeedr plugin and activated it using the connection key provided on my Datafeedr account. Tha’s it. To import the products and settings from Datafeedr I just click the update products and settings button and all the products will be automatically imported to my store.

Final Look
Here is how my homepage looks like. You can take a look at the live site. I did a bit of customization in Datafeedr to display it as 5 columns for my products but it was pretty easy. All the thumbnails look great and the links are working properly. I’m very satisfed with my online store considering the amount of little work put in. It look me less than a day to setup Datafeedr and add close to 200 products to my store, imagine if you have to manually add each product it without Datafeedr. It will take more than week to get it done!
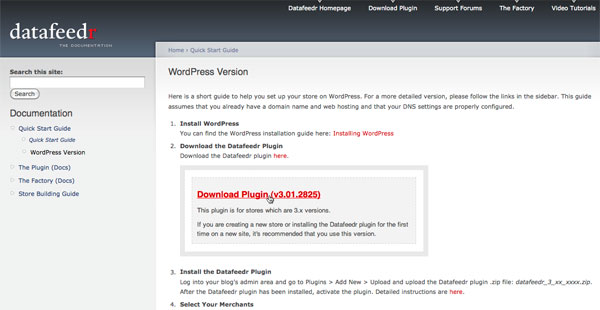
Documentation
Datafeedr provides lots of useful documentations to help you get started. It has a large library of video tutorials for step by step instructions. It is very complete with over 80 videos and covers all the features in Datafeedr.

An active forum is also available to help you get your answers for any questions you have regarding Datafeedr.

The word douentation is another place to quickly find help on setting up your first Datafeedr store.
Factory Home Settings
On the factory home page, you can add your merchants and store. You can also add your Amazon API Settings.
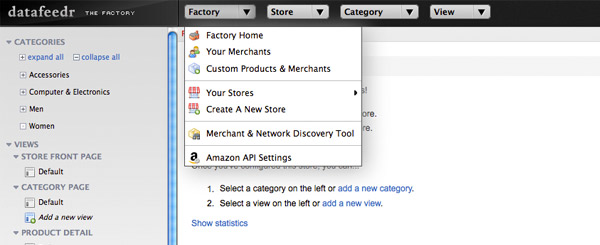
Your Merchants
On the merchant page, you will be able to select merchants from your favorite affiliate store. You will be able to select from major affiliate merchants like Amazon, Commission Junction, Linkshare, Clickbank, Shareasale and many more…

Store Settings
In store settings, you can actually input affiliate ids and merchants for your online shop. You can also adjust the url, add custom CSS, sitemaps, new categories as well. I will go through some of the main features in store settings.

Store Merchants
Store merchants allow you to select the merchant products you want to display when you search and add new products in your store.

Affiliate IDs & Tracking Parameters
On the affiliate ID page, you can fill in your affiliate ID so that all the products have your affiliate code.

URL Settings
You can customize how you would like your url to appear. This helps you SEO optimzie your permalinks for better rankings in search engines.

Drip Settings
By enabling drip settings, you will be able to auto drip new products to your store. This makes your website look updated and helps you add products to your store automatically.

Custom CSS
If you are a developer and want to customize how the shop looks, you can always use custom CSS to modify your store. This gives you control over the layout and look and feel of the shop.

Browse Products
Browse products help you search for items to add to the show. You can enter keywords to quickly look for relevant products to add to your category.

Category Settings
On category settings you have some basic settings to manage your categories. You can add sub categories, view products and add new products to your categories.

Category Properties
Caetgory properties allow you to add thumbnail image, slug and descriptions to your category pages in your store.

View Settings
View sets how each of your page looks, it’s like a template. You can edit your front page view, category view, product view and search page view. You can even create a custom view for a certain category so it looks differnt from the rest.
Store Front Page View
On the store front page view, you can adjust the text and set how you want to display the products on the front page.

Product Detail View
Product detail view page allows you to control how you want your product detail page to appear. You can customize breadcrumbs, text, the product detail and others.

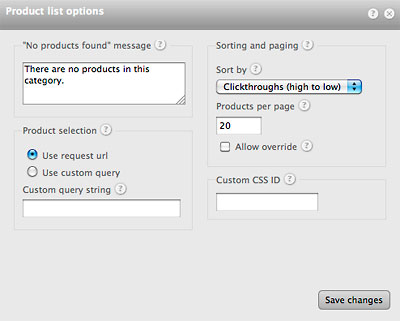
Category Page View
Cateogry page let’s you customize how you want the category list and product list to show.
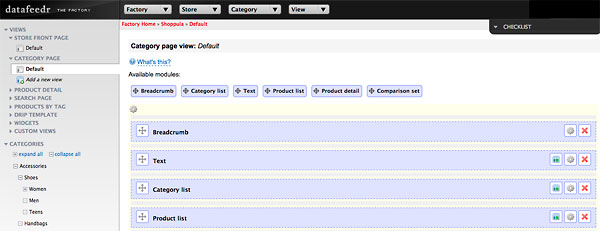
You can set product list options to set how many products per page to show.
You can even edit the html code to modify how it looks.
